The Edit Diets screen
From ZDN User Guide
The Edit Diets screen is the core of Zoo Diet NaviGator.
Header

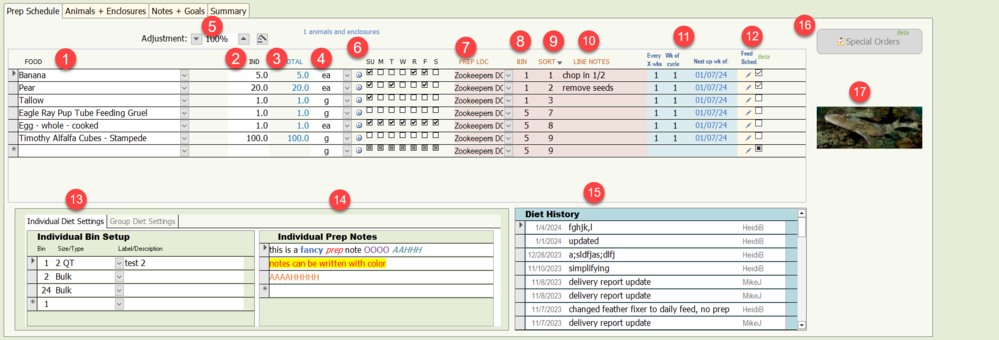
The numbers below refer to the red numbers in the image above.
- Diet Info
- The DIET NAME is anything you want to call the diet. People usually pick one or two of the following, but it can be whatever you want: house name (Fluffy), animal count (2.3 ducks), accession number (12345), location, or diet purpose (breeding season, weight gain, growth, etc.). Examples: Fluffy (12345); 2.3 ducks; Unicorn Herd Enrichment; Fifi Weaning Diet
- The TARGET TAXA is whatever species you are aiming for. "Mixed Species" is an option if you are including more than one taxa on a single diet. You can double-click this drop-down to get to the Edit Species screen where you can add a new species.
- DEFAULT PREP BY is the name of your physical diet "book" or kitchen station where most of the diet items for this diet will be prepared. This doesn't do much except save you a few clicks below where you won't have to pick a PREP BY for every food.
- DELIVERY LOC is however you group various diets together. It doesn't necessarily mean you deliver the diets there. This might be a designated shelf for a group of diets, a large delivery tote for an area, or an actual stop on a delivery route.
- Checkboxes
- ACTIVE indicates diets that are currently in use at your institution. If an animal dies or leaves your institution, un-check this box and it will no longer show up in reports and prep. You cannot delete diets. They are part of your historical record at your institution. But, you can mark them as inactive.
- LABEL indicates whether or not a label/sticker is printed for this diet. This is only relevant if you use ZDN to print your labels.
- NC PREPARES indicates whether the kitchen (Nutrition Center) prepares this diet. Unchecking this will prevent the diet from appearing on the touchscreen or on labels. This may go away soon because "Prep by" covers this same ground and is more flexible.
- ANALYZED is not "checkable" by the user. But, it will become checked if you click the "Analyze Diet" button to let you know it has been analyzed.
- Buttons
- NEW DIET creates a new, blank diet for you to fill in
- SAVE DIET will trigger the process of asking you for a diet change reason, saving a historical version of the diet (to the Diet History window), and saving a PDF (if configured to do so). This process will also be triggered if you leave this screen (to go to another diet or window), so you don't need to click the button. Your changes to the diet itself are actually always saved as soon as you edit the diet, so you do not actually need to save those. But many people like having a "save" button, so it is here for you.
- Navigate section
- The dropdown menu is a list of all your diets. You can quickly jump among them by scrolling. This obviously works better for smaller institutions than larger ones.
- You can also type the diet number in the dropdown and hit <enter> and it will jump to that diet.
- You can also type numeric accession numbers in the box and it will go to the first diet for that animal (which may or may not be the diet you want to go to, so use caution). This doesn't work for non-numeric accession numbers with letters or punctuation in them.
- You can filter the dropbox by park and whether or not inactive diets are shown using the fields below.
- Advanced Search
- Clicking this button will open up a more robust search window where you can search by species, house name, accession numbers (including those that contain text and punctuation), and more.
- Reports
- The selection in the drop-down will affect the behavior of the buttons to the right.
- There are many report options and you should explore them to see which ones work best for which situations at your institutions.
- Print will bring up a "print preview" of the diet card in the selected format
- You can also email reports and save to PDF (defaults to the location set up in the Settings)
- You can toggle whether you want to analyze the diet at the individual diet level or at the group level depending on which report you have picked.
- To analyze for an individual animal by itself (without the other animals on the same diet), double-click on the animal's ID number in the "Animals and Enclosures" tab.
- History button
- This will open the History window, where you can view past history records. You can copy and paste from historical diets to current diets by selecting the food rows (use the gray boxes to the left of each row) and clicking Copy (<control-C>) and then going back to the current diet (or a different diet) and choosing paste (<control-V>).
Prep Schedule Tab

The numbers below refer to the red numbers in the image above.
- FOOD: This is where you enter foods on diets. As with all lists in Access, you enter new info in the blank line at the bottom. If it isn't visible, you may need to scroll down to get to the blank line. Double-click on a food name (not a blank line) to open the "Edit Foods" screen for that food. If you see a blank food where you know there ought to be a food, it is likely because that food is inactive. Double-click the line and check "Active" on the Edit Foods screen that opens up.
- IND: This is where you enter the amount for one animal.
- TOTAL: If you have more than one animal listed on the Animals & Enclosures tab, then the Total will be the Individual animal amount multiplied by the number of animals on this diet. You can't edit this - you have to adjust the number of animals or the individual amount for this to update.
- UNIT: Select a unit. Units of weight (g, kg, oz, lbs, etc.) are always able to be used. If you select a custom unit (bag, ea, bottle, cup, etc), then be sure to define a weight for it in the Edit Foods window. You will see warnings on the Welcome Switchboard if you have custom units in use that don't have associated weights defined. Fix these for reporting to work correctly.
- Note that "ea" means one item. 1 ea apple just means one apple. It does NOT mean "one apple per animal".
- ADJUSTMENT: You can quickly do diet adjustments using the Adjustment section. Click the up and down arrows to adjust the numbers. 105% means a 5% increase. 100% means stay the same. 95% means a 5% decrease, etc. You'll see the temporary new amounts appear below. Once you are happy with the previewed amounts, click the "magic wand" button to update the actual amounts of each food. You'll get a confirmation message about updating the rows. Say yes.
- DAYS: You can select which days of the week an item is offered. Clicking the clock icon on the left will toggle all the days on or off.
- PREP LOC: This is the "book" or kitchen prep location where the food is prepared. It defaults to whatever you selected in the header. You can double-click this field to add/edit the PREP LOCs for your zoo.
- BIN: This is the container that foods within a diet are placed in. Foods with the same BIN number will be placed in the same container. For example, if you put the greens, vegetables, and fruits together in a "salad", but place the mealworms in a separate cup for training, then you would use the same bin number for the greens, vegetables, and fruits, but a different bin number for the worms.
- SORT: Within a bin, this will control the order the foods appear on reports. There is a small triangle next to "Sort" that will refresh the order of the foods using BIN and SORT. So, if you make changes to the groupings, click the triangle to see your changes.
- LINE NOTES: this is for comments that apply to just that food. See Prep Notes (below) for notes that pertain to the entire diet.
- ROTATIONS: This is to set up rotations longer than one week. For example, many snakes feed every other week (every 2 weeks). You would mark "2" under "every X weeks". If you want the food offered on the first week of a two week cycle, select "1" for "Week of Cycle", otherwise, select "2". For more details, see the Rotations page.
- FEED SCHEDULES: If you want to feed animals differently than the prep schedule you have just created, click here to edit the Feed Schedule for that food item. If you don't set up a feed schedule, it will assume the animal will be fed as prepared. For example, you might send a week's worth of pellets on Sunday for the keepers to feed daily. The Prep Plan would show 700 g of pellets on Sunday. The Feed Plan would be set up to show 100 g of pellets each day of the week.
- BIN SETUP: You can set up bins at the individual or group diet level. Individual bins are used when printing individual diet cards (a single diet). Group bins are used when printing group diet cards (multiple diets combined). For each bin, enter the number, choose a container (you can edit the container list by double-clicking it), and add any descriptive information needed.
- PREP NOTES: This is where you can write notes that pertain to the entire diet. This is also where comments entered from the Touchscreen will appear. Double-clicking will open up a larger window to read/enter a more thorough note. In that pop-up window, you can set a large font size for easier viewing.
- DIET HISTORY: this is a brief snippet of the diet history. Double-click to view the full entry in a pop-up window. In that pop-up window, you can set a large font size for easier viewing.
- SPECIAL ORDERS: you can add items here for one-time delivery (if you use touchscreens or labels)
- IMAGE: this will show the image that users will see on the Touchscreen.
> Grouping animals and diets together: Herd Diets and Group Diets
